
Vegetables
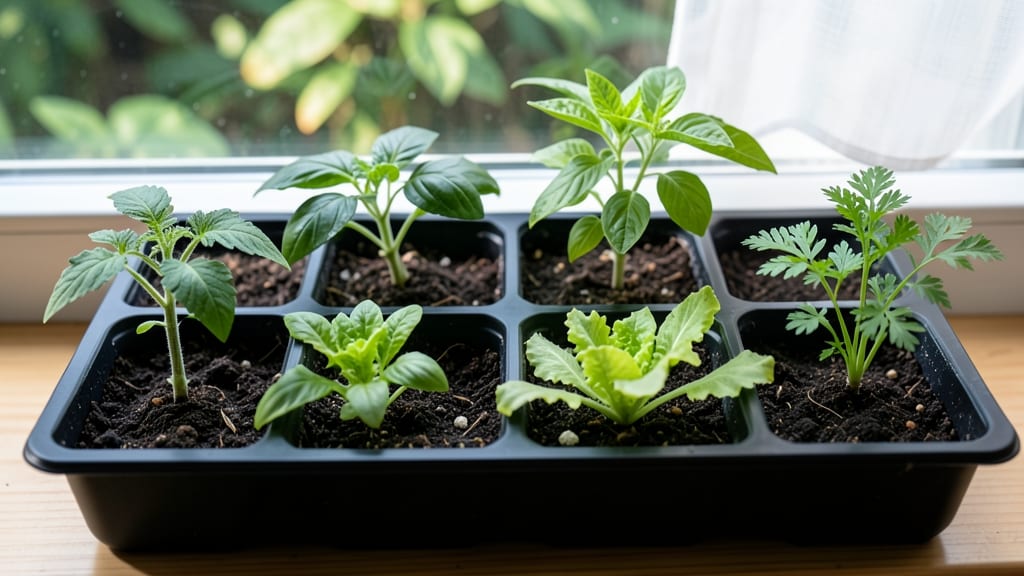
Those first little green hooks in vegetable seedlings images mean your garden’s future is already sprouting. 🌱 I’ll never forget the thrill of seeing my tomato seedlings push through the soil—each one a promise of summer’s bounty.
This guide shows you exactly what healthy seedlings look like at every stage, from the first cotyledons to stocky transplants ready for the garden.
You’ll learn to spot the subtle signs of vigor: strong stems, vibrant leaves, and roots that fill their containers. We’ll cover the most common mistakes—overwatering, leggy growth, and disease—that can turn your seedlings from thriving to struggling in days.
Even experienced gardeners use this guide to refine their timing and care.
By the end, you’ll recognize the difference between a seedling that’s ready to thrive and one that needs extra attention. The right care now means bigger harvests later—no more sad, stunted plants. Let’s get those starts off to the perfect beginning.
Whether you’re starting from seed in a basement or under grow lights, these visual cues apply to every setup. The key is watching, not guessing. Here’s how to tell a winner from a flop before you even plant it out.
📚 In This Guide
- What you need
- Instructions
- Tips and common mistakes
- Wrapping up and next steps
What you need
- ● Vegetable Seedlings: 5–10 healthy seedlings (choose from your favorite veggies like tomatoes, peppers, or leafy greens—pro tip: 💡 snap a photo for reference!
- ● Grow Lights or Sunlight: Indoor: LED grow lights (12–16 hrs/day, 2000–6500K spectrum)
- ● Outdoor: Full sun (6+ hours/day) or a shaded spot for delicate seedlings
- ● Containers: 4–6" pots (drainage holes required!) or seed trays with cells
- ● Potting Mix: 1–2 bags of sterile, well-draining seedling mix (avoid garden soil—it’s too dense!)
- ● Watering Can or Spray Bottle: Fine-mist nozzle for gentle hydration
- ● Fertilizer: Balanced liquid fertilizer (5-5-5 or 10-10-10, diluted to half-strength)
- ● Humidity Dome or Plastic Wrap: To retain moisture during germination
- ● pH Test Kit: Ensures soil pH is 6.0–7.0 (ideal for most veggies)
- ● Twine or Plant Labels: Mark seedlings to track varieties
- ● Thermometer: Monitors soil temp (65–75°F is perfect for most seedlings)
- ● Camera or Phone: Capture growth progress for your reference library!
How to identify healthy vegetable seedlings at a glance
Here’s how I spot strong, thriving seedlings—no guesswork needed.
🌱 Step 1: Check Stem Strength and Color
Healthy seedlings have thick, sturdy stems that don’t bend easily when touched. If stems are thin or leggy, they’re weak and may not survive transplanting. Look for a deep green hue—pale or yellowish stems signal poor light or nutrient issues.
Run your thumb along the stem: it should feel firm, not hollow or rubbery. A strong stem means the plant has energy stored for growth. If you see dark spots or wilting, that’s a sign of overwatering or disease—act fast to save it.
🌿 Step 2: Examine the Leaves
First, count the leaves: true leaves (the second set after the initial seed leaves) should be rounded, smooth-edged, and vibrant green. Yellow or curled leaves mean the seedling isn’t getting enough light or nutrients.
Check the leaf arrangement: healthy seedlings have leaves spaced evenly along the stem, not clustered at the top. If leaves are small, pale, or have brown edges, the soil might be too dry or too wet. A quick finger test—press the soil lightly—should feel moist but not soggy.
☀️ Step 3: Assess Root and Soil Health
Gently remove the seedling from its container to peek at the roots. Strong roots are white or pale yellow, spreading outward in a tangled mass—this means the plant is ready for transplanting. If roots are dark, mushy, or circling tightly, the seedling’s been overcrowded or overwatered.
Healthy soil around the roots should smell earthy, not sour or rotten. If you see white mold or black spots, that’s a sign of fungal issues—discard the seedling immediately to prevent spreading. A quick shake test: if soil clumps fall apart easily, it’s well-aerated and ready for the garden.
⏰ Step 4: Verify Growth Stage and Timing
Seedlings should be at the right growth stage for transplanting—usually when they’ve developed 3-4 true leaves. If they’re too small, they’ll struggle in the ground; if they’re too big, they’ll bolt or flop over. Compare your seedlings to reference images for your specific vegetable type.
Timing matters too: most seedlings are ready 4-6 weeks after germination. If they’re taking longer, check your light source—weak seedlings often mean insufficient light. A quick trick: hold a seedling up to a bright window. If it leans toward the light, it’s not getting enough.
🌱 Step 5: Spot Common Red Flags Early
Watch for yellowing between leaf veins—this is classic nutrient deficiency (often nitrogen). Blackened stems at the soil line mean damping-off disease, and stunted growth could signal root-bound conditions. If you see tiny white bugs (fungus gnats), act fast with a light spray of water to knock them off.
Here’s the thing—healthy seedlings bounce back. If you catch issues early, you can often save them with better light, water adjustments, or a pinch of fertilizer. But if a seedling looks too far gone, it’s better to pull it and replant. Trust your eyes: strong starts make strong plants.
Tips & tricks for healthy vegetable seedling identification
Real talk: even experienced gardeners sometimes miss subtle signs in seedlings. Here’s how to spot the details that separate thriving plants from struggling ones.
Light Test Trick: Hold your seedling up to a bright window—if it leans toward the light, it’s not getting enough. I’ve caught weak seedlings early by doing this simple check before they become leggy. For best results, place seedlings within 6 inches of a grow light or in a south-facing window where they get 6-8 hours of sunlight daily.
Root Inspection Hack: When checking roots, look for the "tangled mass" pattern—this means the plant is ready for transplanting. If roots are circling tightly around the container, gently loosen them before planting to prevent girdling. I’ve saved many seedlings by giving their roots a little extra space this way.
Leaf Color Clues: The color between leaf veins is your secret weapon. Yellowing there means nitrogen deficiency, while purple stems signal phosphorus issues. I keep a small notebook to track which nutrients my seedlings need most—it’s saved me from losing entire trays of plants.
Early Intervention: If you spot tiny white bugs (fungus gnats), don’t panic—just spray them off with water. I’ve found that preventing them early is easier than dealing with the damage later. For stubborn infestations, let the soil dry out slightly between waterings to break their life cycle.
Pro Tips for Vegetable Seedlings Images
- Real talk: even experienced gardeners sometimes miss subtle signs in seedlings. Here’s how to spot the details that s...
- Light Test Trick: Hold your seedling up to a bright window—if it leans toward the light, it’s not getting enough. I’v...
- Root Inspection Hack: When checking roots, look for the "tangled mass" pattern—this means the plant is ready for tran...
Frequently asked questions
Got questions about spotting and nurturing healthy vegetable seedlings? You’re not alone! Here are some of the most common queries—plus quick, actionable answers to help you grow a thriving garden.
What do healthy vegetable seedlings look like in images?
Healthy seedlings typically have straight stems, vibrant green leaves (not yellow or brown), and a sturdy root system. Look for consistent growth—no leggy or stunted plants. Compare them to trusted vegetable seedlings images online for side-by-side visuals. Avoid seedlings with holes, wilting, or mold.
How long do seedlings take to be ready for transplanting?
Transplant timing varies by plant! Most seedlings (like tomatoes, peppers, or herbs) are ready in 4–6 weeks when they’ve developed 2–4 true leaves and a strong root ball. Check seed packets for specifics—cool-season crops (e.g., lettuce) may go faster, while warm-season plants need more time. Hardening off (acclimating to outdoor conditions) takes an extra 7–10 days.
Why are my seedlings turning yellow or leggy?
Yellowing leaves often signal overwatering or nutrient deficiencies (like nitrogen), while leggy stems mean too little light. Fix it by:
- Moving seedlings to a sunny window or under grow lights (12–16 hours/day).
- Watering only when the top inch of soil is dry.
- Using a balanced fertilizer (like 5-5-5) if growth stalls.
Can I use regular photos of plants instead of specialized vegetable seedlings images?
While general plant photos can help, they might lack key details like leaf shape or growth stages critical for seedlings. For example, a mature tomato plant’s leaves look very different from a seedling’s! Use vegetable-specific guides (like ours) for accuracy. Apps like PlantNet or Google Lens can also ID seedlings if you’re unsure.
What’s the best way to store extra seedlings if I can’t transplant them yet?
Store seedlings in a cool (50–60°F), bright spot (like a garage with natural light) and water sparingly—just enough to keep soil lightly moist. Avoid refrigeration! For long-term storage (2+ weeks), try:
- Paper bags with holes (for humidity control).
- Peat pots (keeps roots intact).
- Perlite mix to prevent rot.
Wrapping up and next steps
Growing strong, healthy vegetable seedlings starts with identifying them correctly and providing the right care. Whether you're a seasoned gardener or just starting out, recognizing key traits—like leaf shape, color, and growth patterns—can make all the difference. 🌱
Now that you’ve mastered the basics, it’s time to put your knowledge into action. Grab those seedling images, head to your garden (or balcony!), and give your plants the love they deserve. Happy growing—your future harvest is waiting! 🌿
Need a refresher? Bookmark this guide or share it with fellow green thumbs to keep the learning (and planting!) going.