
Vegetables
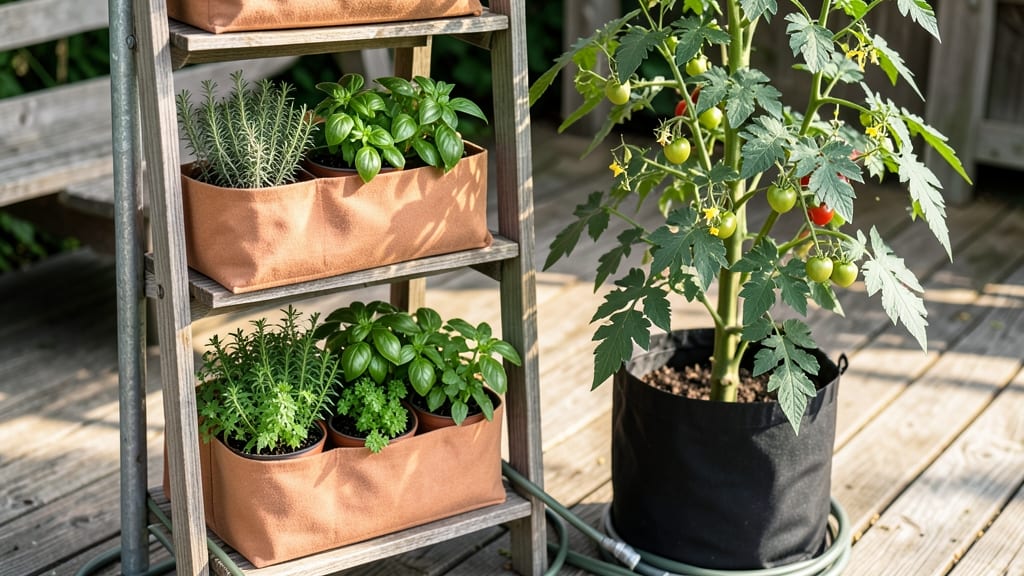
Stackable vegetable planters turned my tiny balcony into a thriving garden—12 square feet now grows enough tomatoes, peppers, and herbs for summer meals. 🌱 The key is choosing the right materials (durable plastic or lightweight fabric) and plants that thrive in containers (like bush beans and lettuce).
You’ll save space without sacrificing harvests, and the vertical design keeps plants accessible for watering and pruning. Just ensure each tier has proper drainage—no soggy roots here!—and rotate planters occasionally for even sunlight exposure.
By mid-July, you’ll be harvesting bright red cherry tomatoes and crisp green basil, all while watching your neighbors eye your setup with envy. The secret? Matching plant needs to pot depth and spacing—shallow roots for greens, deeper pots for tomatoes.
Works for apartments, patios, or even sunny windowsills. Start with a 3-tier setup and expand as your green thumb grows—your balcony will thank you.
📚 In This Guide
- What you need
- Instructions
- Tips and common mistakes
- Wrapping up and next steps
What you need
- ● Stackable planter boxes: 3–5 units (choose durable, lightweight materials like plastic, wood, or fabric). Ensure each has drainage holes and fits snugly on top of the next.
- ● Potting mix: 1–2 bags (high-quality, well-draining organic soil designed for vegetables, ~15–20 lbs total).
- ● Vegetable seeds or seedlings: Choose compact varieties like lettuce, herbs (basil, parsley), cherry tomatoes, or peppers (1–2 plants per planter).
- ● Drainage layer: Small pebbles or broken pottery shards (~1 cup per planter).
- ● Watering can or spray bottle: With a narrow spout for precise watering.
- ● Measuring tape: To ensure even spacing between planters.
- ● Scissors or utility knife: For trimming excess fabric (if using fabric planters).
- ● Slow-release fertilizer: Granules mixed into the soil for steady nutrition.
- ● Self-watering reservoirs: Small containers placed at the bottom of each stack to retain moisture.
- ● Plant labels: Wooden sticks or markers to track what’s growing where.
- ● Garden twine or zip ties: To secure lightweight planters in windy conditions.
- ● Mulch: Straw or shredded leaves to retain moisture and suppress weeds.
How to set up stackable vegetable planters for maximum yield
Here's how I turn small balconies into productive vertical gardens using tiered planters—no wasted space or compromised growth.
🪴 Step 1: Select and Assemble Planters with Proper Spacing
Choose stackable planters with built-in drainage holes—12-16 inches deep for root crops like carrots or 8-10 inches for leafy greens and herbs. Stack them with 3-4 inches between tiers to allow airflow and prevent water pooling. I use lightweight plastic or composite materials for easy repositioning when needed.
Place the bottom tier on a stable surface or use a saucer to catch runoff. If your balcony has uneven surfaces, add a small piece of landscape fabric between tiers to prevent soil from mixing. This ensures each plant gets the right growing conditions without competition for nutrients.
🌱 Step 2: Layer Soil and Plant Starts Strategically
Fill each tier with high-quality potting mix, leaving 1 inch below the rim for watering. For the bottom tier, add a 2-inch layer of coarse gravel or perlite at the base to improve drainage. This prevents soggy roots, which is especially critical in stacked systems where water can linger.
Plant the largest, most heavy-rooted vegetables in the bottom tier—think tomatoes, peppers, or bush beans—then work upward to smaller plants like lettuce, herbs, or radishes. I always stagger plants so their canopies don’t block light for lower tiers. Watch for first true leaves to confirm even growth across all levels.
☀️ Step 3: Position for Optimal Light and Airflow
Place your stack in a location with 6-8 hours of direct sunlight daily, preferably facing south or west. If you’re using a north-facing balcony, supplement with a grow light on a timer for 12-14 hours/day. Rotate the stack a quarter turn weekly to prevent leaning toward the light.
Ensure the top tier gets as much light as the bottom—shade from upper plants can smother lower ones. I keep the top tier slightly elevated with a small riser if needed, and always check for even color across all leaves. Pale or yellowing leaves mean one tier isn’t getting enough light.
💧 Step 4: Water and Fertilize with Precision
Water from the top tier down, allowing moisture to seep through each level. Use a slow-release fertilizer at planting, then supplement with a balanced liquid feed every 4-6 weeks. Overwatering is the biggest mistake—always wait until the top inch of soil feels dry before watering again.
Mulch the top tier with 1 inch of shredded bark to retain moisture and reduce evaporation. This also keeps soil temperatures stable, which is crucial for stacked systems where heat can escape from the top. Watch for wilting leaves—a sign of uneven watering or poor drainage in one tier.
✂️ Step 5: Prune and Harvest for Continuous Production
Prune regularly to encourage airflow and prevent disease. For vining plants like cucumbers or beans, use small trellises attached to the sides of the stack. Harvest leafy greens from the top tier first to avoid shading lower plants. I always pick vegetables when they’re 70-80% mature to encourage new growth.
Rotate crops seasonally—plant fast growers like radishes in early spring, then swap for heat-lovers like peppers in summer. This keeps your stack productive year-round. If pests appear, treat the top tier first to prevent them from spreading downward.
Tips & tricks for perfect stackable vegetable planters
Common pitfalls—and how to sidestep every one when growing vertically.
Tier Height Strategy: The 12-16 inch depth for root crops isn't just about room to grow—it's about preventing root binding. I've found that adding a 2-inch layer of coarse gravel in the bottom tier creates a natural drainage zone that mimics natural soil layers. This prevents the dreaded "soggy bottom" syndrome where roots suffocate from excess moisture. For leafy greens in 8-10 inch tiers, I actually use a slightly coarser potting mix to improve aeration in the shallower depth.
Light Distribution Secret: That 6-8 hours of direct sunlight is non-negotiable, but here's what nobody tells you: the top tier often gets 30% less light than the bottom due to shading. I solve this by placing my tallest plants (like sunflowers) in the bottom tier and using reflective surfaces like white trays beneath the stack to bounce light upward. For north-facing balconies, that 12-14 hour grow light becomes essential—position it just above the top tier and use a timer to avoid burning leaves.
Watering Precision: The "water from the top down" method works, but timing is everything. I've ruined multiple stacks by watering when the top inch was still damp. Instead, I use a moisture meter in the middle tier—when it reads dry, that's my cue. For the bottom tier, I always check for water pooling in the saucer after 20 minutes. If you see standing water, your drainage isn't working properly and you need to adjust your gravel layer or add more drainage holes.
Seasonal Rotation Hack: That seasonal crop rotation in Step 5 isn't just about variety—it's about preventing soil depletion. I keep a simple chart tracking which nutrients each plant family uses (like heavy feeders like tomatoes vs. light feeders like lettuce). After two seasons with the same crop family in a tier, I refresh that soil completely. This extends your stack's productivity by years without needing to rebuild.
Pro Tips for Stackable Planters For Vegetables
- Common pitfalls—and how to sidestep every one when growing vertically.
- Tier Height Strategy: The 12-16 inch depth for root crops isn't just about room to grow—it's about preventing root bi...
- Light Distribution Secret: That 6-8 hours of direct sunlight is non-negotiable, but here's what nobody tells you: the...
Frequently asked questions
Got questions about stackable vegetable planters? You’re not alone! Here are some of the most common queries—and their practical solutions—to help you grow like a pro in limited space.
What’s the best way to stack planters without them toppling over?
Use weighted bases or interlocking designs to keep them stable. Place the heaviest planter (like one with root veggies) at the bottom, and avoid overfilling with soil. For extra security, anchor them to a railing or wall with non-damaging straps. Windy balconies? Add a windbreak or secure planters to a sturdy frame.
When is the best time to plant vegetables in stackable planters?
For cool-season crops (like lettuce, spinach, or kale), plant in early spring or fall when temps are 50–75°F. Warm-season veggies (tomatoes, peppers, beans) thrive after the last frost (usually mid-to-late spring). Check your local frost dates—stackable planters warm up faster, so start seeds 2–4 weeks earlier than ground planting.
Are stackable planters worth the investment over traditional pots?
They save space (ideal for balconies or small yards), maximize sunlight (rotate planters for even growth), and reduce water waste (stacked designs often have built-in drip irrigation). Plus, they’re portable—move them to follow the sun! If budget is tight, start with DIY pallet planters or repurpose plastic bins with drainage holes.
How do I prevent pests in stackable vegetable planters?
Pests love crowded spaces! Space plants properly (follow seed packet guidelines), use row covers for aphids/cabbage moths, and rotate crops yearly to avoid soil-borne issues. Neem oil or companion planting (e.g., basil with tomatoes) deters bugs naturally. Elevate planters off the ground to discourage slugs/snails, and check undersides for hitchhiking pests.
Can I grow heat-loving veggies (like peppers or eggplants) in stackable planters?
Yes! But they need full sun (6+ hours/day) and well-draining soil. Use heat-tolerant varieties (e.g., ‘Jalapeño’ or ‘Black Beauty’ eggplant), and place planters in the southernmost spot on your balcony. If temps exceed 90°F, provide afternoon shade with a sheer cloth. Self-watering stackable planters help maintain moisture during heatwaves.
What do I do if my vegetables wilt or stop growing in stackable planters?
Wilting often means underwatering or overwatering. Check soil moisture (stick your finger 1–2 inches deep—if dry, water thoroughly). Root-bound plants? They may need repotting. Yellow leaves? Could be nutrient deficiency—try a balanced fertilizer or compost tea. No growth? Ensure they’re getting enough sunlight (supplement with grow lights if needed) and ventilation (crowding stunts plants).
Wrapping up and next steps
Stackable vegetable planters are a game-changer for small spaces, turning even the tiniest balconies into lush, productive gardens! 🌱 Whether you're a seasoned gardener or a beginner, these space-saving solutions make growing fresh veggies easier and more organized.
With the right setup, you’ll enjoy homegrown harvests without sacrificing style or square footage.
Ready to dive in? Start by choosing your favorite veggies—herbs, leafy greens, or compact tomatoes—and create your vertical oasis today! 🌿 Review the materials checklist or browse common questions to kickstart your project.